Re-scaling QtSvgDialGauge's Tachometer skin
I've been experimenting with QtSvgDialGauge in a personal project, and so far, I like it a lot! :)
For those who don't know, QtSvgDialGauge is nice SVG-based dial/gauge widget, which is part of the Qt Embedded Widget demos. You can see it (and several other embedded widgets) in action in the Qt Embedded Widgets Catalog and Qt Patient Care Demo applications. And you can download the source for both applications here.
Now, the Qt Embedded Widget demos includes three SVG-based skins for the QtSvgDialGauge class: Tachometer, Thermometer, and Amperemeter. You can see examples of all three in the following Qt Embedded Widgets Catalog screenshot:
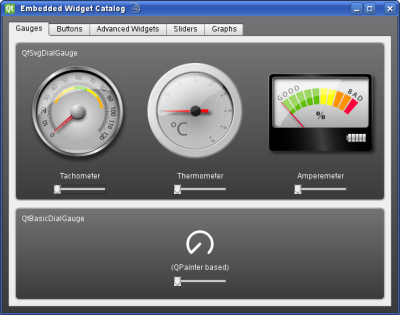
For my project, I wanted to use the Tachometer skin (the one on the left). However, if you look closely, you'll notice
that the skin's range is labelled from 0 to 120, but I wanted it to scale from 0 to 100, to represent a percent scale.
So, I set about modifying the background SVG file (skins/svgdialgauge/Tachometer/background.svg) accordingly.
According to comments embedded into the Tachometer background.svg file, it was originally generated using
"Adobe Illustrator 13.0.2, SVG Export Plug-In". But since SVG files are simply specialised XML files, which is itself a
text-based format, and I don't have any graphics SVG editing tools, I set about editing the SVG file using a plain text
editor (Notepad++ to be specific). Adobe Illustrator (or rather it's SVG
Export plug-in?) does not produce commented human-readable SVG files, so the first thing I did was add some blank lines
and XML comments to aid readability. Then, I went ahead and replaced all of the digits and tick marks with my own
scaled equivalents.
Here's an example rendering of both the original Tachometer (left), and my re-scaled version (right):
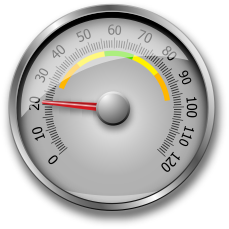
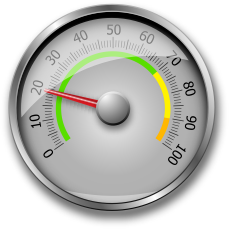
As you can see, I've also re-scaled the inner green, yellow and orange bands - this part proved to be the most difficult by far (more on that later). I also made the minor tick marks slightly thinner than the major tick marks - which, while being quite subtle, adds a nice touch, in my opinion :)
Now the original background.svg file used absolute start / end coordinates for everything - including positioning of the text and the tick marks. This is fine for graphical editors (and is presumably easier for Adobe Illustrator to export), but is extremely tedious to edit manually, so I replaced all of the text and tick mark elements with versions that are rotated around the needle's center point instead - much easier to work with! :)
Now we come back to those inner color bands... it's pretty obvious how to describe the positioning of those bands using a center point, radius, and start / end angles. Unfortunately, SVG does not support this :( Specifically, the SVG path element only supports cubic Bézier, quadratic Bézier, and elliptical arc curves - none of which make use of a center point about which to draw the curves.
So, after plenty of investigation, including a number of failed attempts at using the the standard SVG curved path commands by trial and error, in the end I created a simple (well, maybe not that simple... depends on how you look at it) OpenOffice spreadsheet to convert arcs from center, radius, and start/end angles to SVG elliptical arc curve commands. Note, this spreadsheet does not work for all quadrants and/or ellipse variations (indeed, it only works for perfect circles, for example) but certainly does all that is needed for calculating the QtSvgDialGauge's inner color bands.
So, if you are ever wanting to customise the QtSvgDialGauge's Tachometer background skin using a text editor (as opposed
to a graphical SVG editor), then I'd highly recommend you begin with
my custom background.svg file instead of the original, since mine would be much easier to
work with in most situations. You can find my custom background.svg file and
arc spreadsheet both listed below.
Finally, I should mention that my re-scaled Tachometer background spreads the needle's range over a slightly smaller
range than the original. So when instantiating QtSvgDialGauge with
my custom background.svg file, you should set QtSvgDialGauge's start and end angles to -125
and 125 respectively (the original background.svg ranged from -130 to 133 degrees). For example:
QtSvgDialGauge *gauge = new QtSvgDialGauge;
gauge->setSkin("Tachometer");
gauge->setNeedleOrigin(0.486, 0.466);
gauge->setMinimum(0);
gauge->setMaximum(100);
gauge->setStartAngle(-125);
gauge->setEndAngle(125);
Enjoy! ;)
